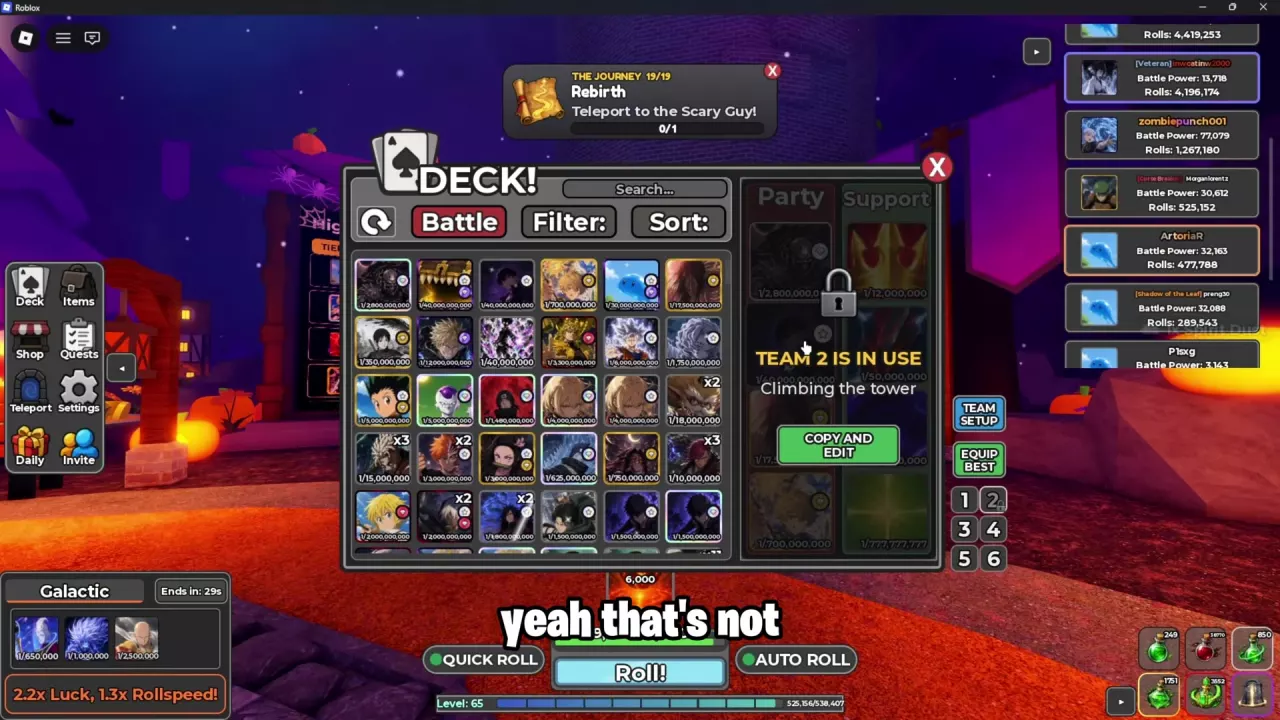
Build Your Party and Support Setup
- Open Deck using the spade-card icon.
- Select Battle. Hover over a card thumbnail to read its stats and ability, then click it to add it to Party.
- Add your cards in the combat order you want. To equip a duplicate, click the same thumbnail again while another owned copy is available.
- Switch to Support and equip support cards in the separate Support column. Owned duplicates work here too: two Rusted Chains can occupy separate support positions.
The later Deck interface has four Party slots and four Support slots, with Team Setup and numbered team entries 1–6 beside the equipment columns. Search, Filter, and Sort help you find cards in a larger collection.
Compare the actual versions, attack, HP, and abilities you own before replacing a slot. Use the card directory for individual abilities and variant details. If an active team is locked, follow the editing steps below.
Starter Parties and the Next Useful Replacement
Start with the cards you own
If your early collection contains these cards, one starter order is:
Luck Voltia → Rock Lee → Rock Lee → Soma Schicksal
This early Normal-card lineup lost its first Normal Eraserhead attempt. Treat it as a starting formation to improve as your collection grows, rather than a clear requirement. Luck Voltia supplies an immediate entry attack, while the duplicate Rock Lee fills a slot without requiring a fourth distinct card.
Replace a slot with Tanjiro for first-hit damage
If you obtain Normal Tanjiro, consider replacing one of the starter fillers and placing him after Luck Voltia. Tanjiro's first attack against each new opposing card deals 35% more damage, so his benefit applies again when he reaches a new opponent. He does not need to lead the entire party to use that bonus.
This is a useful replacement direction when you want earlier damage from a slot. Compare it with the version you would remove: Normal Rock Lee gains 25% attack every three turns, but after three gates open he loses 10% maximum HP per turn, making prolonged fights costly.
A later party with two Gons
If you own two Gons and Speedwagon, another lineup to try is:
Gon → Gon → Luck Voltia → Speedwagon
Support: Rusted Chain ×2
Normal Rusted Chain adds 20% maximum HP and, when the supported card dies, permanently reduces its killer's attack by 30%. That gives the lineup both extra health and a way to weaken an enemy for the cards that follow. The order relies on short damage windows from Gon and a living damage aura from Speedwagon; the next section explains how to preserve those roles.
Arrange Auras, Entry Effects and Successors
These ordering recommendations follow each ability's trigger: whether the card needs to stay alive, enter combat, attack, or die.
- Keep Speedwagon later in the queue. His aura gives all team cards 20% more damage while he is alive. A later position reduces his exposure to direct frontline attacks while earlier cards benefit. Enemy backline and team-wide damage can still hit him.
- Use Luck Voltia for immediate pressure. Normal Luck Voltia attacks on entry for 60% damage. Leading with him delivers that hit at the start; placing him later gives you an entry hit when he takes over.
- Put a damage dealer after Mumen Rider. Normal Mumen Rider reduces Party damage taken by 15% while alive. When he dies, the next entering card deals 10% more damage for two turns. Keep him later if preserving the defensive aura matters more; place him immediately before your intended attacker if you want that attacker to receive the death bonus.
- Give Ice Reaper a useful successor. Bankai: Hakka no Togame freezes the enemy for three turns and permanently reduces its attack by 30% on death. Place a damage dealer after Ice Reaper to take advantage of that opening. Shiny Copyblade Mentor can also temporarily copy this ability from an opposing Ice Reaper.
- Treat Gon as a burst card. Below 30% HP, Normal Gon's next attack deals 2.2× damage, but he dies at the end of that turn. Plan for the next card to take over instead of relying on Gon to absorb damage throughout a long fight.
For the underlying turn sequence and why waiting cards can take damage, see combat mechanics.
Build a Tower Team Around Your Collection
For multi-card tower encounters, build a sequence that weakens the enemy queue, converts weakened targets into kills, and leaves a capable attacker ready to take over. Choose the roles your collection can support.
| Team role | Cards to consider | How to use the slot |
|---|---|---|
| Weaken the frontline and next enemy | Prismatic Bone Knight | On entry, reduces enemy attack by 25% and maximum HP by 15%. Each attack also deals 40% piercing damage to the next enemy card. Consider an early position to soften targets for later attackers. |
| Damage the whole enemy queue | Prismatic Crimson Warlord | Its entry meteor deals 15% of each enemy card's own maximum HP, with another meteor every four turns. It also has 1.3× attack damage and 20% damage reduction. The meteor effect does not affect Boss NPCs. |
| Convert kills into temporary fighters | Shiny Shadow Monarch | After a kill, creates a shadow with 40% of the defeated card's stats. The shadow fights in its place for two turns or until it dies. Consider placing it after a card that has already damaged the queue. |
| Provide another source of queue damage | Dumb Threeblade Ronin | Its entry hit damages the entire enemy team for 15% of its own attack. Each attack has a 30% chance to hit the next enemy card for full damage, making it an alternative when you need backline pressure. |
| Keep dealing damage through repeated attacks | Prismatic The Dancer | Gains 15% damage against higher-stat cards and guarantees a 2× critical hit every third attack. Favor it when its stats let it survive long enough to repeat those attacks. |
| Adapt to a useful enemy ability | Shiny Copyblade Mentor | Temporarily copies opposing abilities. Consider it against effects such as Bone Knight's weakening and piercing damage, Ice Reaper's death freeze, or Dragon Emperor's transformation. |
A practical order to consider is queue damage first, a kill-focused attacker next, then a sustained attacker, with the remaining position serving an aura or successor effect. For example, Bone Knight or Crimson Warlord can soften targets before Shadow Monarch enters. This arrangement is most useful when the versions you own have enough damage and health to perform those jobs.
Match support to the team's damage pattern
Starlight Blade suits a team built around cards that stay alive and keep attacking. Every third attack deals 2.5× damage; if that attack kills an enemy, the next attack retains the bonus. Choose it when your attackers can reach that third hit and continue into another target.
Sovereign Will favors a sequence of damage dealers. It grants 35% attack on entry, and kills by the current card give the next entering card 30% attack per kill. Place a capable attacker after your kill-producing card so the transfer has a useful recipient.
Use the support comparison to choose between offensive effects and survival support. For broader ability priorities across your collection, consult the tower ability tier list.
Unlock a Team for Editing
Cards currently in battle cannot be equipped or unequipped. A tower team can display TEAM 2 IS IN USE and Climbing the tower, with its Party and Support columns locked. You can inspect newly acquired cards, but receiving them does not unlock the active team.
- Open the active tower battle and select Pause or End.
- Wait for the current floor to finish; those controls take effect after that floor.
- Reopen Deck once the team is no longer fighting, then adjust Party and Support.
The locked-team overlay also has a Copy and Edit button beneath the status message. To replace cards on the team currently climbing, use the stop-and-wait steps above. See the Infinite Tower guide for pausing, continuing, and ending a run.
Rebuild after Prestige
After Prestige leaves Party and Support empty, return to Deck and equip your available battle and support cards again before starting another challenge. Open Profile to read Battle Power beside the equipped Party. Review it together with individual stats and ability conditions when judging the rebuilt team.
For what the reset keeps and removes, see the Prestige guide.